
Your favorite local coffee shop uses a gooseneck kettle to serve customers rich, flavorful pour-over coffee. You have a daily craving for it and wish you could make the same cup of pour-over coffee at home. After all, buying pour-over coffee from a third-wave coffee parlor isn’t exactly cheap these days, right?!
So, how do you make pour-over coffee with a gooseneck kettle at home the right way?
Making pour-over coffee with a gooseneck kettle at home requires attention to many small (yet important) details, like using water with low mineral content and heating it to an appropriate temperature. Also, you must use the right coffee-to-water ratio (1:15-1:17 is the recommended range) and pre-wet the filter paper before blooming the coffee bed. Finally, slowly pour the heated water over the coffee beans and let the coffee brew. Serve with whole milk.
This manual brewing process may look simple on paper, where you just need to follow a series of steps; however, in truth, many homeowners get the details of these steps wrong. From water quality to heating temperature to coffee brewing ratios, everything matters. They can literally be the difference between a full-bodied cuppa of pour-over coffee and an astringent, bitter-tasting brew.
Let’s dive into the details of the brewing steps of pour-over coffee using a gooseneck kettle.
Brewing Pour Over Coffee with a Gooseneck Kettle – A Step-By-Step Guide!
We’ll get to the steps shortly, but first, you’ll need a few things to start your flavorful pour-over Java journey.
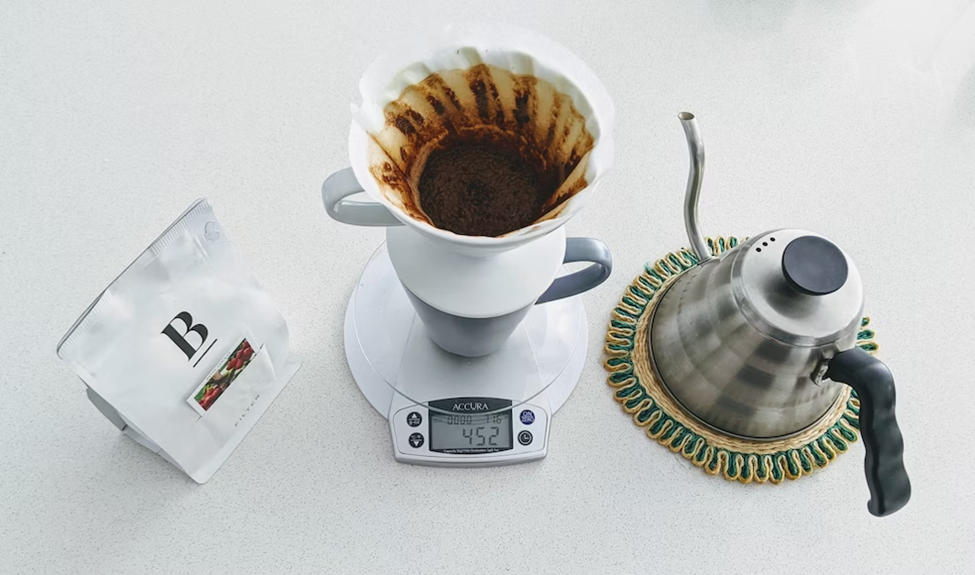
Things You Need to Make Pour-Over Coffee
Here is the list of things you'll need for manual pour-over coffee brewing at home:
- Freshly-roasted coffee beans
- Stovetop gooseneck kettle
- Heat source
- Dripper
- Paper filters
- Spoon
- Weighing scale
- Coffee grinder
- Decanter or cup
- Timer
You’d find many online resources that say having the weighing scale is optional, but we absolutely recommend it. The scale helps you measure your grams and coffee-to-water ratio precisely. A quick note on the kettle front. You might think, “Hey, I’ve got a regular kettle. Can’t I just use that?”
While you can use a regular kettle for pour-over coffee, it's not recommended. As you’ll see later, the pouring technique is really important for achieving the best brewing results. Traditional kettles often have larger spouts, making it difficult to control and distribute the water flow rate evenly over the coffee grounds. They simply lack the precision for manual brewing, causing too much agitation in the coffee bed.
Agitation in the context of pour-over coffee refers to the disturbance of the coffee bed during the brewing process. While agitating the coffee bed is important to extract desirable compounds from the coffee beans, excessive agitation can lead to over-extraction or astringency.
That’s why using a gooseneck kettle makes sense. It gives you a more controlled pour and water dispersion, allowing you to avoid excessive turbulence in the coffee bed. This leads to a better, more balanced cup of pour-over coffee.

Okay, now that you have your brewing setup live and ready, let’s get to the actual steps of making pour-over coffee using a gooseneck kettle at home.
Step #1: Fill Your Gooseneck Kettle with Cold Water
To begin, fill your gooseneck kettle with cold water. What is the best water to use for pour-over coffee? We recommend using your regular home tap water. Just make sure the water is not hard or high in mineral content and has acceptable Total Dissolved Solids (TDS) concentration.
Hard water or water with a high mineral content contains excessive amounts of dissolved calcium and magnesium. These minerals make the coffee extraction process slower and can leave a chalky taste in your final brew. They can also affect the performance and longevity of your gooseneck kettle over time. The level of mineral content in water is measured in parts per million (ppm) and referred to as TDS. According to the Specialty Coffee Association (SCA), a TDS range of 75-250 ppm is acceptable for brewing coffee, but 150 ppm is ideal.
In case if you live in an area with an extreme hard water supply (and are unsure about your tap water quality), you can use soft bottled water for pour-over coffee.
Also, the water you use should be neutral, with a pH of 6.5-7.5 for a balanced taste. How much water do you need for pour-over coffee? That depends on how many cups you want to brew. For a single cup of pour-over coffee, 250ml of water is enough. Here is a chart to guide you further:
|
Serving Size |
Water Needed |
|
1 cup |
~250ml |
|
2 cups |
~500ml |
|
4 cups |
~1000ml |
Once you’ve filled the kettle with water, proceed to heating.
Pro Tip: Always use the same kettle for heating the water and brewing the coffee. Some people heat the water in a separate container and then transfer it to a brewing kettle. This decanting step results in heat loss, which can affect your brewing results.
Step #2: Heat the Water for Brewing
When brewing pour-over coffee, the temperature you heat the water is crucial in achieving optimal flavor. What temperature should you heat the water for pour-over coffee? Contrary to popular opinion, there is no one fixed recommended heating temperature. It all depends on the roast levels of your coffee beans.

|
Roast Level |
Recommended Water Temperature/°C |
|
Lighter |
96-98°C |
|
Medium |
90-95°C |
|
Dark |
83-85°C |
Also, the type of funnel or dripper you use can influence the water temperature greatly. A hotter temperature is recommended to offset the heat loss if you’re using a glass, ceramic, or metal dripper.
Pro Tip: It can be difficult to monitor water temperature when using a conventional stovetop gooseneck kettle unless you’ve an external thermometer. Unfortunately, not many homeowners keep one at home. Also, it can get a little inconvenient. That’s why we recommend purchasing a stovetop gooseneck kettle with a built-in thermometer. Lux Haus is proud to be among the few manufacturers of stainless steel stovetop gooseneck kettles with built-in thermometers in the market. Our kettles are made to be high-quality, providing you with long-lasting coffee gear for your Java adventures.
Step #3: Prepare the Coffee Grounds
Use freshly-roasted pour-over coffee beans only. These have their complex flavors and natural oils preserved and make for a flavorful cup of joe. Of course, you must grind them before using them for making coffee.
When grinding the beans, having the right pour-over coffee grind size is crucial. If the grinds are too coarse, the water won't be able to extract enough flavor from the beans, resulting in a weak and slightly sour brew.
On the other hand, if the grind size is too fine, it will make the brew astringent, bitter, and overly strong. We recommend using a finer grind for lighter roasts and a coarser grind for darker roasts. This would optimize the extraction process and enhance the overall taste of your coffee.
How much coffee beans should you use for pour-over coffee? As a general guideline, a coffee-to-water ratio of 1:16 is preferred for most brews. So if you’re making two cups of coffee (500 ml), you’ll need approximately 30 grams of grounded coffee. This translates to roughly 2 tablespoons, where one tablespoon equals 14.175 grams. However, you can adjust the coffee brewing ratio based on your desired coffee strength.
|
Serving Size |
Coffee grounds (Grams measurement) |
Coffee grounds (Tablespoon measurement) |
|
1 cup (250 ml) |
~15 grams |
~1 tablespoon |
|
2 cups (500 ml) |
~30 grams |
~2 tablespoon |
|
4 cups (1000 ml) |
~60 grams |
~4 tablespoon |
Step #4: Pre-Wet the Filter
The next step in the brewing process is pre-wetting the filter. But why use a paper filter in the first place? The primary function of a paper filter is to separate the brewed coffee from the coffee grounds and any fine sediment or oils. The paper acts as a barrier, allowing only the liquid coffee to pass through while trapping the undesirable particles. This results in a smoother cup of coffee without excessive oiliness. A paper filter also helps to regulate the water flow rate during the pour-over process. It slows down the water as it passes through, allowing for a more controlled extraction.
Two types of coffee paper filters are available in the market: unbleached paper filters and bleached paper filters.
Unbleached paper filters offer less filtration efficiency due to the presence of natural fibers but are more environmentally friendly. They have a slight yellow appearance. In contrast, bleached paper filters are treated with a bleaching agent and produce a cleaner, crisper extract. They have a bright white color. In the end, the type of paper filter you use has minimal impact on your pour-over coffee flavor.
Why do we pre-wet the filter? Pre-wetting the filter helps eliminate the paper taste that might find its way into your coffee. To pre-wet the filter, simply pour hot water over it, just enough to thoroughly wet it. Once done, discard the water and move on to blooming the beans.
Step #5: Bloom the Coffee Beans
Blooming is an important step in the coffee brewing process. It helps release the trapped gasses from the coffee grounds, ensuring better water penetration and extraction.
When coffee is first roasted, it produces carbon dioxide as a natural byproduct. The carbon dioxide gas gets trapped inside the coffee beans. If not released, it can hinder the water from extracting full flavor from the coffee grounds. This can result in a sour or under-extracted coffee. Blooming helps overcome this problem.
How do you make pour-over coffee bloom? Gently pour the hot water over your coffee grounds. We recommend using 2 grams of water per gram of coffee for blooming. For example, if you’re making 2 cups of coffee, you’ll use 60 grams of water (~12.5 percent of your total liquid). Let the coffee bloom for around 45 seconds to achieve optimal degassing. You can give the coffee bed a gentle swirl. The swirling movement would ensure even saturation of the coffee grounds, resulting in improved degassing and uniform extraction.

Pro Tip: Create a well in the center of the coffee bed before blooming. This prevents water from pooling on the top and ensures the grounds are saturated evenly. It also allows for the trapped gasses to escape more easily.
Step #6: Brew the Coffee
It's time to brew your pour-over coffee for final extraction. The brewing process consists of two stages. In the first stage, you pour around 48% of your hot water over the bloomed coffee bed. For 2 cups of coffee that would be 240 grams of water. This should take around 30 seconds. In the second and final stage, you pour over the remaining water (40% of your total liquid) from your gooseneck kettle. This, again, should take 30 seconds. Leave the coffee bed to dry to complete the brewing process.
It’s recommended to stir and swirl the coffee bed to ensure even extraction. Start with stirring the bed in one direction with the help of a spoon and then in the opposite direction, followed by a final swirl.
Also, it’s crucial to maintain the right pouring technique when using the gooseneck kettle. Keep the kettle relatively low to ensure minimum agitation and prevent channeling. Avoid pouring directly into the center of the coffee bed; instead, pour in a circular motion. This ensures the coffee grounds are fully saturated and an even, flavorful extraction.
Step #7: Serve and Enjoy
Once you’ve brewed your pour-over coffee, it's time to serve and enjoy. Your coffee should have a balanced, full-bodied mouthfeel with a clean, rich finish. If your coffee tastes overly bitter, it may be due to the wrong water temperature (too hot) or using finer grounds. For a coffee that tastes sour, water quality or coarser grounds could be the issue.
In either case, adjusting the water quality, temperature, and grind size according to the above instructions can help balance the flavors. Don’t forget to serve in a pre-warmed mug and add sugar to taste, if desired.
Pro Tip: You can add a dash of high-quality whole milk for a creamy cup. It adds richness to the coffee without overwhelming its original flavors. You can also use skimmed milk if you’re watching your calorie intake. Soy, oat, or almond milk are good options if you’re lactose intolerant or vegan. To enhance the taste further, add ground cloves, nutmeg, or cinnamon to the grounds before brewing. Additionally, you can add a splash of your favorite syrup, like vanilla or hazelnut, to your cuppa.
Can You Use the Same Grounds Twice for Brewing Pour-Over Coffee?
You can’t use the same grounds twice for brewing pour-over coffee. A complete brewing process is meant to fully extract the flavorful compounds responsible for the coffee's aroma, acidity, and body. Reusing the grounds would extract more bitter compounds, resulting in a weaker, less flavorful cup of coffee.
How to Clean Your Gooseneck Kettle After Each Use?
To clean your electric gooseneck kettle after each use, rinse it thoroughly with water. Pay attention to hard-to-reach areas, especially the spout. If there are stubborn stains, you can use a small amount of dish soap on the inside of the kettle - be careful not to scrub too aggressively. Lastly, clean the kettle exterior using a soft cloth or dish towel and allow it to air dry completely. You can learn more about maintaining your gooseneck kettle in our gooseneck kettle cleaning guide.
3 Pour-Over Coffee Mistakes Beginners Make
When brewing pour-over coffee, beginners often make mistakes that can leave them with a drying mouth sensation and a ruined cuppa. Here are the three most common ones:
1) Using hard water with high alkalinity - Coffee has an acidic pH, and hard water with high alkaline content can throw off its pH balance. This leads to a pour-over coffee that tastes either bitter or bland. Use purified tap water with less than 120 TDS content. Avoid splurging on pricey mineral water brands (unless you’ve no other option)
2) Not measuring the coffee-to-water ratio - Some homeowners try to use guesswork when measuring their coffee and water weights. This often results in a much wider or narrower coffee-to-water ratio than desired. Always use a weighing balance to avoid measurement errors.
3) Agitating the coffee bed too much - Beginners often make the mistake of agitating the coffee bed too much. This happens because they aren't careful with their pouring technique, causing excessive turbulence in the brew bed and leading to an overly bitter coffee. Using a gooseneck kettle with a precision spout can provide much-needed control over the water flow rate and distribution, ensuring optimal extraction.
Why Use a Gooseneck Kettle for Pour-Over Coffee
Using a gooseneck kettle for pour-over coffee offers greater precision and control, resulting in a superior extraction and brew.
Unlike a regular kettle, a gooseneck kettle has a long, thin spout. This spout design allows for a slow and steady pour while ensuring water is distributed evenly across the coffee bed. Its lighter weight (if using a stovetop model) further makes the handling easier, which is extremely important to pull off the sophisticated pouring technique manual brewing requires.
You can learn more about how using a gooseneck kettle for pour-over coffee gives you a brewing edge in our why use a gooseneck kettle for pour-over coffee guide.
In short, knowing the finer (and important) details of the manual brewing process and having the right coffee gear in your coffee kit are critical for your pour-over coffee journey. If you lack either of those, you can struggle big time.
Luckily, you now have all the information you need to make rich and flavorful pour-over coffee at home. All that’s left is investing in the best home pour-over coffee equipment.
What’s the best gooseneck kettle for homeowners?
Best Stovetop Gooseneck Kettles for Pour Over Coffee
- LuxHaus Gooseneck Kettle - Our top pick. Sleek stainless-steel design, heat-resistant handle, precision spout, designed to work with all stovetops. It comes with a built-in thermometer for convenient temperature monitoring. Rated 4.7 on Amazon!
- V60 Buono Gooseneck Kettle - Another stovetop gooseneck kettle with a generous 1.2-liter capacity. Compatible with electric, gas, and induction stovetops. No temperature monitor, though.
- Fellow Stagg EKG - Electric gooseneck kettle with a stylish look. Offers temperature monitoring and fast heating time. Lacks the versatility of the other two options. On the pricier end.
You can learn more about these kettles in our best stovetop gooseneck kettles guide. Cheers to many perfect pours ahead!